Bài này chúng ta sẽ cần cài 2 máy chủ ubuntu: 1 với vai trò Master và 1 với vai trò Worker

Yêu cầu:
-
Two Ubuntu 22.04+ servers (one master, one worker)
-
Each node: 4+ CPUs, 4GB+ RAM, 50GB+ disk
-
Static IPs and hostnames set
-
Internet access on both nodes
1. Set Hostnames and Update Hosts File
On Master Node:
sudo hostnamectl set-hostname "elearning-k8s-master"On Worker Node:
sudo hostnamectl set-hostname "elearning-k8s-worker1"Hoặc bạn có thể kiểm tra lại host name bằng lệnh sau:
root@elearning-k8s-master:~# hostnamectl
 Static hostname: elearning-k8s-master
       Icon name: computer-vm
         Chassis: vm
      Machine ID: a6047e6b11ae4a39ab3ee07f837b2493
         Boot ID: e02d11c5972245b5a895c0c0ab9b6dcc
  Virtualization: vmware
Operating System: Ubuntu 22.04.2 LTS
          Kernel: Linux 5.15.0-141-generic
    Architecture: x86-64
On Both Nodes:
Edit /etc/hosts to include both nodes’ IPs and hostnames:
192.168.101.150 elearning-k8s-master
192.168.101.151 elearning-k8s-worker1
Replace IPs with your actual addresses
2. Disable Swap and Configure Kernel Parameters
On Both Nodes:
sudo swapoff -a
sudo sed -i '/ swap / s/^/#/' /etc/fstab
Load kernel modules:
sudo tee /etc/modules-load.d/containerd.conf <<EOF
overlay
br_netfilter
EOF

sudo modprobe overlay
sudo modprobe br_netfilter
Set sysctl params:
sudo tee /etc/sysctl.d/kubernetes.conf <<EOF
net.bridge.bridge-nf-call-ip6tables = 1
net.bridge.bridge-nf-call-iptables = 1
net.ipv4.ip_forward = 1
EOF

sudo sysctl --system
3. Install Container Runtime (containerd)
On Both Nodes:
sudo apt update
sudo apt install -y curl gnupg2 software-properties-common apt-transport-https ca-certificates
curl -fsSL https://download.docker.com/linux/ubuntu/gpg | sudo gpg --dearmor -o /etc/apt/trusted.gpg.d/docker.gpg
sudo add-apt-repository "deb [arch=amd64] https://download.docker.com/linux/ubuntu $(lsb_release -cs) stable"
sudo apt update
sudo apt install -y containerd.io
Configure containerd:
sudo mkdir -p /etc/containerd
containerd config default | sudo tee /etc/containerd/config.toml >/dev/null 2>&1
sudo sed -i 's/SystemdCgroup = false/SystemdCgroup = true/g' /etc/containerd/config.toml
sudo systemctl restart containerd
sudo systemctl enable containerd
4. Add Kubernetes Repository and Install Tools
On Both Nodes:
sudo mkdir -p /etc/apt/keyrings
curl -fsSL https://pkgs.k8s.io/core:/stable:/v1.34/deb/Release.key | sudo gpg --dearmor -o /etc/apt/keyrings/kubernetes-apt-keyring.gpg
echo 'deb [signed-by=/etc/apt/keyrings/kubernetes-apt-keyring.gpg] https://pkgs.k8s.io/core:/stable:/v1.34/deb/ /' | sudo tee /etc/apt/sources.list.d/kubernetes.list
sudo apt update
sudo apt install -y kubelet kubeadm kubectl
sudo apt-mark hold kubelet kubeadm kubectl
5. Initialize Kubernetes Cluster (Master Node Only)
On Master Node:
sudo kubeadm init --control-plane-endpoint=elearning-k8s-master --pod-network-cidr=192.168.0.0/16
The --pod-network-cidr is required for most network plugins (e.g., Calico, Flannel)
Khi cài đặt cho master thành công nó sẽ báo như sau:
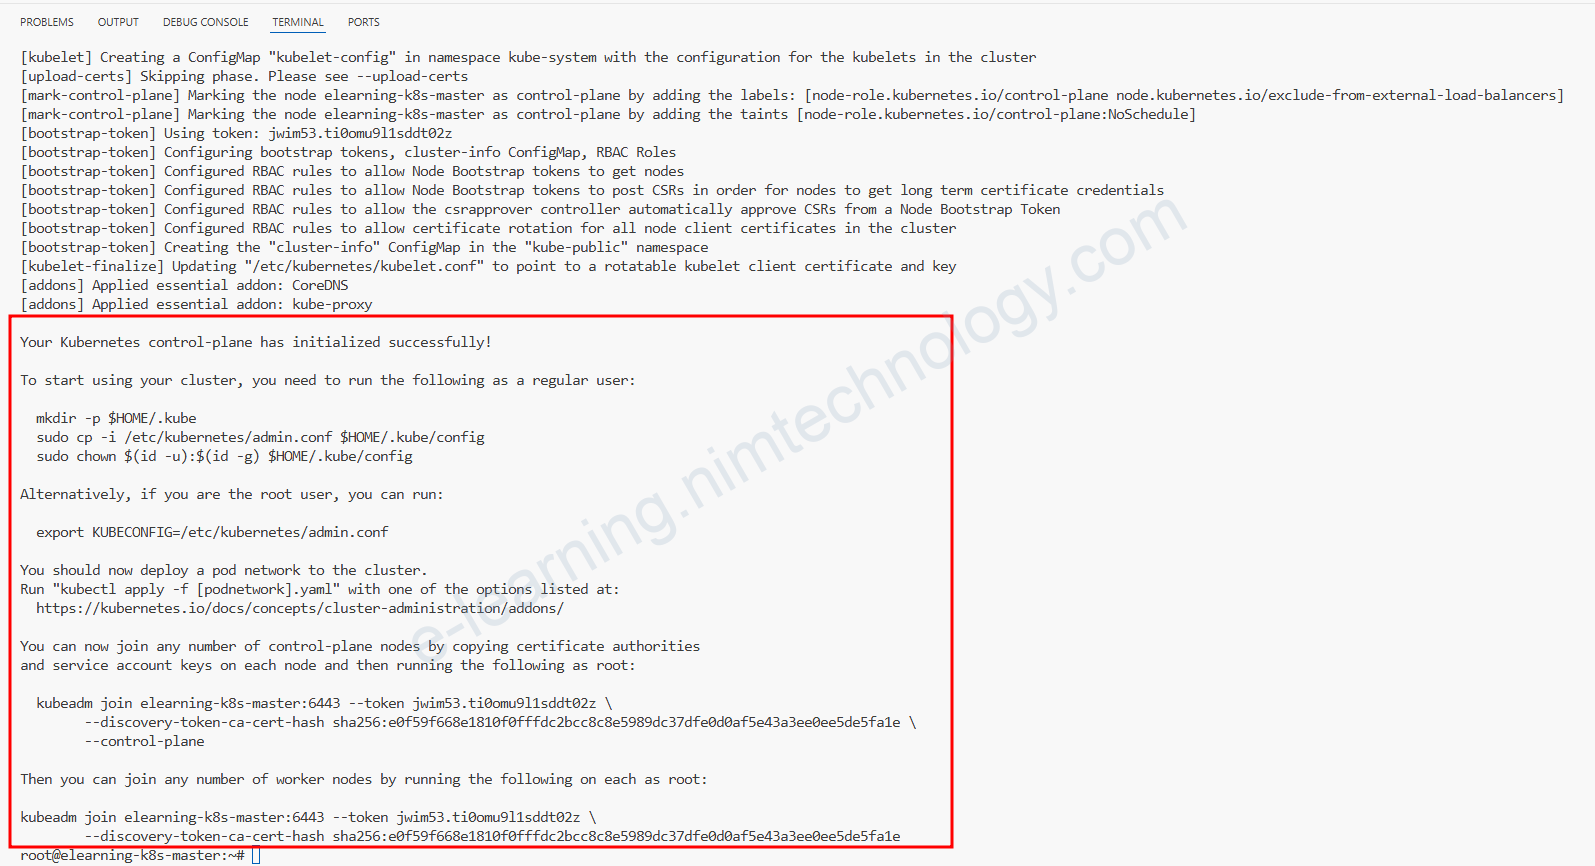
After initialization, follow the on-screen instructions to set up your kubeconfig:
mkdir -p $HOME/.kube
sudo cp -i /etc/kubernetes/admin.conf $HOME/.kube/config
sudo chown $(id -u):$(id -g) $HOME/.kube/config
6. Install a Pod Network Add-on (Master Node Only)
Example: Calico
kubectl apply -f https://raw.githubusercontent.com/projectcalico/calico/v3.26.0/manifests/calico.yaml
Wait a few minutes, then check node status:
kubectl get nodesNodes should show as Ready
Add-ons network là thành phần không thể thiếu để các Pod trong Kubernetes có thể giao tiếp, cấp phát IP, định tuyến, bảo mật và vận hành đúng theo thiết kế của hệ thống. Nếu không cài đặt, các Pod sẽ không thể kết nối với nhau, khiến cluster không hoạt động đúng chức năng.
7. Join Worker Node to the Cluster
On Worker Node:
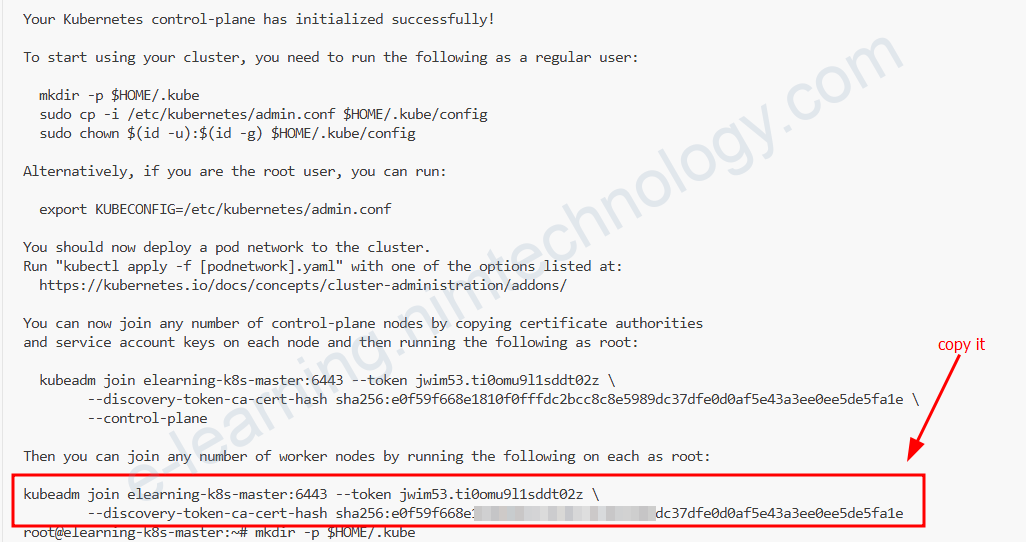
Use the kubeadm join ... command output by the master node initialization (step 5). It looks like:
sudo kubeadm join k8smaster:6443 --token <token> --discovery-token-ca-cert-hash sha256:<hash>Bạn cứ lấy như trong ảnh nhe:
After joining, check with the master:
kubectl get nodesBoth nodes should appear as Ready
8. Test Your Cluster
On Master Node:
kubectl create deployment nginx-app --image=nginx --replicas=2
kubectl get deployment nginx-app
kubectl expose deployment nginx-app --type=NodePort --port=80
kubectl get svc nginx-app
Access the app via the worker node’s IP and the NodePort shown